Android的應用程序的入口定義在AndroidManifest.xml文件中可以找出:
[html]
<manifest
xmlns:android="http://schemas.android.com/apk/res/android"
package="com.android.launcher">
<original-package android:name="com.android.launcher2" />
…
<application
android:name="com.android.launcher2.LauncherApplication"
…
>
<activity
android:name="com.android.launcher2.Launcher"
…
>
<intent-filter>
<action android:name="android.intent.action.MAIN" />
<category android:name="android.intent.category.HOME" />
<category android:name="android.intent.category.DEFAULT" />
<category android:name="android.intent.category.MONKEY"/>
</intent-filter>
</activity>
…
</application>
</manifest>
從中我們可以知道啟動過程需要先後初始化LauncherApplication和Launcher的對象。更加簡潔的說,啟動過程可以分成兩步,第一步在
LauncherApplication.onCreate()方法中,第二部在Launcher.onCreate()方法中。
先看第一步,代碼片段如下:
[java]
public void onCreate() {
super.onCreate();
// 在創建icon cache之前,我們需要判斷屏幕的大小和屏幕的像素密度,以便創建合適大小的icon
final int screenSize = getResources().getConfiguration().screenLayout & Configuration.SCREENLAYOUT_SIZE_MASK;
sIsScreenLarge = screenSize == Configuration.SCREENLAYOUT_SIZE_LARGE ||
screenSize == Configuration.SCREENLAYOUT_SIZE_XLARGE;
sScreenDensity = getResources().getDisplayMetrics().density;
mIconCache = new IconCache(this);
mModel = new LauncherModel(this, mIconCache);
// 註冊廣播接收器
IntentFilter filter = new IntentFilter(Intent.ACTION_PACKAGE_ADDED);
……
registerReceiver(mModel, filter);
//註冊ContentObserver,監聽LauncherSettings.Favorites.CONTENT_URI數據的變化
ContentResolver resolver = getContentResolver();
resolver.registerContentObserver(LauncherSettings.Favorites.CONTENT_URI, true,
mFavoritesObserver);
}
LauncherApplication是Application的子類,是整個程序的入口。因此,一些全局信息的初始化和保存工作就放到這裡執行。包括屏幕大小,像素密度信息的獲取,以及
BroadcastReceiver和ContentObserver的註冊都在整個程序的開始就完成。LauncherApplication的工作結束之後,下面就開始初始化Launcher瞭。Launcher是一個Activity,
而Activity的生命周期中,有幾個重要的回調方法,而onCreate()方法是最先被執行的用於進行初始化操作的。那下面就來看看Launcher.onCreate()中具體做瞭哪些操作:
[java]
protected void onCreate(Bundle savedInstanceState) {
…
mModel = app.setLauncher(this);
mIconCache = app.getIconCache();
…
mAppWidgetManager = AppWidgetManager.getInstance(this);
mAppWidgetHost = new LauncherAppWidgetHost(this, APPWIDGET_HOST_ID);
mAppWidgetHost.startListening();
…
//檢查本地保存的配置是否需要更新
checkForLocaleChange();
setContentView(R.layout.launcher);
//對UI控件進行初始化和配置
setupViews();
//向用戶展示指導的頁面
showFirstRunWorkspaceCling();
registerContentObservers();
…
if (!mRestoring) {
//為Launcher加載數據
mModel.startLoader(this, true);
}
…
}
可以通過時序圖,直觀的認識下,onCreate()中主要進行瞭哪些操作:
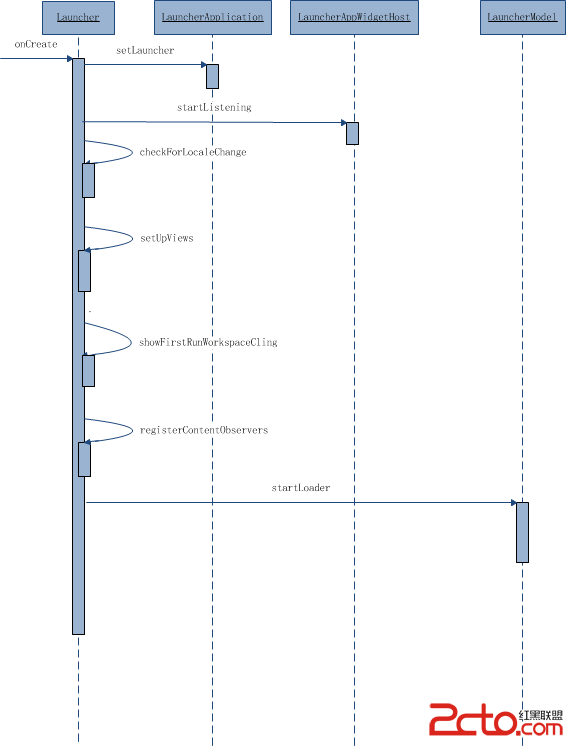
可以將Launcher.onCreate()所執行的操作大概分為七步:
1、LauncherAppliaction.setLauncher()。
2、AppWidgetHost.startListening(),對widget事件進行監聽
3、checkForLocaleChange(),檢查更新本地保存的配置文件
4、setupViews(),配置UI控件
5、showFirstRunWorkspaceCling(),第一次啟動時顯示的指導畫面
6、registerContentObservers(),設置內容監聽器
7、LauncherModel.startLoader(),為Launcher加載Workspace和AllApps中的內容
那麼,下面就一步一步的順著執行的過程來看Launcher啟動過程中都做瞭些什麼。
Step1:LauncherApplication.setLauncher()
調用LauncherAppliction對象的setLauncher()方法,得到一個LauncherModel對象的引用,setLauncher內容如下:
[java]
LauncherModel setLauncher(Launcher launcher) {
mModel.initialize(launcher);
return mModel;
}
在setLauncher中繼續執行瞭mModel對象的initialize方法,在initialize中隻有小段代碼:
[java]
public void initialize(Callbacks callbacks) {
synchronized (mLock) {
mCallbacks = new WeakReference<Callbacks>(callbacks);
}
}
由於Launcher實現瞭Callback接口。在mModel中,將傳入的Launcher對象向下轉型為Callback賦值給mCallbacks變量。並在LauncherModel中獲得瞭一個Callbacks的軟引
用通過這一過程,將Launcher對象作為Callback與mModel進行綁定,當mModel後續進行操作時,Launcher可以通過回調得到結果。
Step2:mAppWidgetHost.startListening()
LauncherAppWidgetHost繼承自AppWidgetHost,它的作用就是幫助Launcher管理AppWidget,並且能夠捕獲長按事件,使得應用可以正常的刪除、添加
AppWidget。通過調用mAppWidgetHost.startListening()方法,開啟監聽。
Step3:checkForLocaleChange()
接下來執行checkForLocaleChange(),方法內容如下:
[java]
private void checkForLocaleChange() {
if (sLocaleConfiguration == null) {
//從本地存儲文件中加載配置信息,包括locale地理位置、mcc移動國傢代碼
//mnc移動網絡代碼
new AsyncTask<Void, Void, LocaleConfiguration>() {
@Override
protected LocaleConfiguration doInBackground(Void… unused) {
LocaleConfiguration localeConfiguration = new LocaleConfiguration();
readConfiguration(Launcher.this, localeConfiguration);
return localeConfiguration;
}
@Override
protected void onPostExecute(LocaleConfiguration result) {
sLocaleConfiguration = result;
//從本地取出信息後,再次調用
checkForLocaleChange();
}
}.execute();
return;
}
//得到設備當前的配置信息
final Configuration configuration = getResources().getConfiguration();
final String previousLocale = sLocaleConfiguration.locale;
final String locale = configuration.locale.toString();
final int previousMcc = sLocaleConfiguration.mcc;
final int mcc = configuration.mcc;
final int previousMnc = sLocaleConfiguration.mnc;
final int mnc = configuration.mnc;
boolean localeChanged = !locale.equals(previousLocale) || mcc != previousMcc || mnc != previousMnc;
if (localeChanged) {
sLocaleConfiguration.locale = locale;
sLocaleConfiguration.mcc = mcc;
sLocaleConfiguration.mnc = mnc;
//清空Icon
mIconCache.flush();
final LocaleConfiguration localeConfiguration = sLocaleConfiguration;
//將更新後的數據重新寫入本地文件保存
new Thread("WriteLocaleConfiguration") {
@Override
public void run() {
writeConfiguration(Launcher.this, localeConfiguration);
}
}.start();
}
}
在這個方法中,先是檢查瞭本地文件的配置與當前設備的配置是否一致,如果不一致,則更新配置,並且清空IconCache,因為配置的改變可能會改變語言環境,
所以需要清空IconCache中的內容重新加載。
Step4:setupViews()
setupViews()方法調用,在這個方法中簡單的對所有的UI控件進行加載和配置:
[java]
/**
* Finds all the views we need and configure them properly.
*/
private void setupViews() {
final DragController dragController = mDragController;
…
// Setup the drag layer
mDragLayer.setup(this, dragController);
// Setup the hotseat
mHotseat = (Hotseat) findViewById(R.id.hotseat);
if (mHotseat != null) {
mHotseat.setup(this);
}
// Setup the workspace
mWorkspace.setHapticFeedbackEnabled(false);
mWorkspace.setOnLongClickListener(this);
mWorkspace.setup(dragController);
dragController.addDragListener(mWorkspace);
// Get the search/delete bar
mSearchDropTargetBar = (SearchDropTargetBar) mDragLayer.findViewById(R.id.qsb_bar);
// Setup AppsCustomize
mAppsCustomizeTabHost = (AppsCustomizeTabHost)
findViewById(R.id.apps_customize_pane);
mAppsCustomizeContent = (AppsCustomizePagedView)
mAppsCustomizeTabHost.findViewById(R.id.apps_customize_pane_content);
mAppsCustomizeContent.setup(this, dragController);
// Get the all apps button
mAllAppsButton = findViewById(R.id.all_apps_button);
if (mAllAppsButton != null) {
mAllAppsButton.setOnTouchListener(new View.OnTouchListener() {
@Override
public boolean onTouch(View v, MotionEvent event) {
if ((event.getAction() & MotionEvent.ACTION_MASK) == MotionEvent.ACTION_DOWN) {
onTouchDownAllAppsButton(v);
}
return false;
}
});
}
// Setup the drag controller (drop targets have to be added in reverse order in priority)
dragController.setDragScoller(mWorkspace);
dragController.setScrollView(mDragLayer);
dragController.setMoveTarget(mWorkspace);
dragController.addDropTarget(mWorkspace);
if (mSearchDropTargetBar != null) {
mSearchDropTargetBar.setup(this, dragController);
}
}
由於UI組件較多,setupViews中所進行的操作也比較繁瑣,先通過時序圖來簡單的理一下吧:

這裡一共包括5個UI組件和一個DragController,那就一步一步地看都進行瞭哪些操作吧。
1、DragLayer
首先我們簡單的認識下Draglayer。DragLayer繼承自FrameLayout,是整個Launcher的根容器。當快捷圖標或者AppWidget被拖拽時,事件的處理就在DragLayer進
行操作的,DragLayer.setup()方法的內容如下:
[java]
public void setup(Launcher launcher, DragController controller) {
mLauncher = launcher;
mDragController = controller;
}
隻是簡單的做瞭賦值操作,使DragLayer持有Launcher和DragController對象的引用。DragController可以幫助其實現拖拽操作。
2、Hotseat
Hotseat也是FrameLayout的直接子類,代表主屏幕下方的dock欄,可以放置4個快捷圖標和一個進入AllApps的按鈕。代碼如下:
[java]
public void setup(Launcher launcher) {
mLauncher = launcher;
setOnKeyListener(new HotseatIconKeyEventListener());
}
方法調用之後,Hotseat持有Launcher對象的引用,並且用HotseatIconKeyEvenListener對自身的按鍵進行監聽,進入HotseatIconKeyEvenListener可以看到:
[java]
class HotseatIconKeyEventListener implements View.OnKeyListener {
public boolean onKey(View v, int keyCode, KeyEvent event) {
final Configuration configuration = v.getResources().getConfiguration();
return FocusHelper.handleHotseatButtonKeyEvent(v, keyCode, event, configuration.orientation);
}
}
調用方法handleHotseatButtonKeyEvent()來處理相應的事件:
[java]
static boolean handleHotseatButtonKeyEvent(View v, int keyCode, KeyEvent e, int orientation) {
…
switch (keyCode) {
case KeyEvent.KEYCODE_DPAD_LEFT:
…
break;
case KeyEvent.KEYCODE_DPAD_RIGHT:
…
break;
case KeyEvent.KEYCODE_DPAD_UP:
…
break;
case KeyEvent.KEYCODE_DPAD_DOWN:
…
break;
default: break;
}
return wasHandled;
}
handleHotseatButtonKeyEvent()方法中根據當前的方向,對KeyEvent.KEYCODE_DPAD_LEFT、KeyEvent.KEYCODE_DPAD_RIGHT、
KeyEvent.KEYCODE_DPAD_UP、KeyEvent.KEYCODE_DPAD_DOWN即可能存在(如果手機有實體按鍵)的導航按鈕上、下、左、右進行響應。這樣Hotseat
的初始化工作就完成瞭。
3、Workspace的初始化
先調用setHapticFeedbackEnabled(false),使其在觸摸的時候沒有觸感反饋。接著設置長按事件的監聽setOnLongClickListener(this),Launcher實現瞭
OnLongClickListener接口,看看Launcher中是如何進行響應的:
[java]
public boolean onLongClick(View v) {
…
if (!(v instanceof CellLayout)) {
v = (View) v.getParent().getParent();
}
…
CellLayout.CellInfo longClickCellInfo = (CellLayout.CellInfo) v.getTag();
..
// The hotseat touch handling does not go through Workspace, and we always allow long press
// on hotseat items.
final View itemUnderLongClick = longClickCellInfo.cell;
boolean allowLongPress = isHotseatLayout(v) || mWorkspace.allowLongPress();
if (allowLongPress && !mDragController.isDragging()) {
if (itemUnderLongClick == null) {
// 在空的空間上長按時
mWorkspace.performHapticFeedback(HapticFeedbackConstants.LONG_PRESS,
HapticFeedbackConstants.FLAG_IGNORE_VIEW_SETTING);
startWallpaper();
} else {
…
}
}
return true;
}
這裡我們隻關心與Workspace的長按事件相關的內容,當Workspace發生長按事件時,產生觸感反饋,同時調用startWallpaper進行壁紙的設置:
[java]
private void startWallpaper() {
showWorkspace(true);
final Intent pickWallpaper = new Intent(Intent.ACTION_SET_WALLPAPER);
Intent chooser = Intent.createChooser(pickWallpaper,
getText(R.string.chooser_wallpaper));
startActivityForResult(chooser, REQUEST_PICK_WALLPAPER);
}
showWorkspace(true)的作用是不管當前的Launcher處於什麼狀態,都跳轉到顯示Workspace的狀態,並且帶有動畫過渡。而後面幾段代碼的作用就是彈出
Dialog,包含瞭所有能夠響應ACTOIN_SET_WALLPAPER的action的Activity。然後我們就可以選擇一個來設置比壁紙瞭。接著就是調用Workspace.setup():
[java]
void setup(DragController dragController) {
mSpringLoadedDragController = new SpringLoadedDragController(mLauncher);
mDragController = dragController;
// hardware layers on children are enabled on startup, but should be disabled until
// needed
updateChildrenLayersEnabled();
setWallpaperDimension();
}
代碼中先創建瞭一個SpringLoadedDragController的對象,這個類的作用控制當Launcher處於State.APPS_CUSTOMIZE_SPRING_LOADED狀態時,即處於縮小狀
態時,提供控制Launcher進行滑動、放置item的操作。接著Workspace的成員變量mDragController獲取瞭DragController對象的引用。隨後,調用
updateChildrenLayersEnabled (),註釋中的意思是當子view在創建的時候會開啟硬件層,其它時候關閉。其中調用瞭內部的API這裡就不過多追究瞭。最後,調用
setWallpaperDimension()設置Wallpaper的尺寸。下面還有一步操作調用dragController.addDragListener(mWorkspace)方法,Workspace實現瞭DragListener:
[java]
interface DragListener {
void onDragStart(DragSource source, Object info, int dragAction);
void onDragEnd();
}
這樣mWorkspace就能夠響應拖拽事件瞭,具體響應內容將在後面的文章中進行分析。
這樣mWorkspace的初始化就算完成瞭,主要完成瞭兩件事情:1、設置瞭對長按事件的處理,2、對拖拽事件的處理
4、AppsCustomizeTabHost、AppsCustomizePagedView
AppsCustomizePagedView是內嵌在AppsCustomizeTabHost中的組件,在當點擊AllApp按鈕是,會跳轉到AppsCustomizeTabHost中,而在
AppsCustomizePagedView裝載Icon。初始化時調用AppCustomizedPagedView.setup()方法:
[java]
public void setup(Launcher launcher, DragController dragController) {
mLauncher = launcher;
mDragController = dragController;
}
獲取Launcher與DragController對象的引用。
5、DragController
DragController類主要的工作就是處理拖拽事件,對其進行初始化時分別調用瞭四個方法dragController.setDragScoller(mWorkspace);dragController.setScrollView(mDragLayer);
dragController.setMoveTarget(mWorkspace);dragController.addDropTarget(mWorkspace);那分別看看這四個方法中具體都做瞭什麼:
[java]
public void setDragScoller(DragScroller scroller) {
mDragScroller = scroller;
}
首先我想吐槽下,方法名應該時在敲代碼的時候拼錯瞭,正常情況應該是setDragScroller()~~~~~。Workspace實現瞭DragScroller接口,代表瞭Workspace
可以進行滑動操作。通過此方法獲取到瞭DragScroller對象。接著又調用瞭DragController.setScrollView()
[java]
/**
* Set which view scrolls for touch events near the edge of the screen.
*/
public void setScrollView(View v) {
mScrollView = v;
}
從提供的代碼註釋理解,這個方法設置瞭當屏幕的邊緣觸摸滑動時,所滾動的View。(目前還不清楚具體所指的對象)
[java]
/**
* Sets the view that should handle move events.
*/
void setMoveTarget(View view) {
mMoveTarget = view;
}
設置應該處理移動事件的View,傳入的對象是Workspace。
[java]
/**
* Add a DropTarget to the list of potential places to receive drop events.
*/
public void addDropTarget(DropTarget target) {
mDropTargets.add(target);
}
將Workspace對象作為DropTarget對象添加到mDropTargets中。其中DropTarget接口的定義瞭一個能夠接收拖曳對象的類。當桌面的item被拖拽後,需要找到下一
個容納它的容器,而這個容器就一個DropTarget。
6、SearchDropTargetBar
SearchDropTargetBar管理著搜索框和刪除框的轉換,正常情況下它是一個searchBar,當圖標被拖拽時,它就變成瞭deleteDropTargetBar,將圖標拖放到上面松手就可以將其從Workspace中刪除。
[java]
public void setup(Launcher launcher, DragController dragController) {
dragController.addDragListener(this);
dragController.addDragListener(mInfoDropTarget);
dragController.addDragListener(mDeleteDropTarget);
dragController.addDropTarget(mInfoDropTarget);
dragController.addDropTarget(mDeleteDropTarget);
mInfoDropTarget.setLauncher(launcher);
mDeleteDropTarget.setLauncher(launcher);
}
setup中執行的內容比較繁雜,這裡不作詳細的分析。
這樣setupViews()執行完畢。繼續回到onCreate()方法中分析。
Step5:showFirstRunWorkspaceCling()
showFirstRunWorkspaceCling()方法調用,在應用第一次被啟動的時候,此方法會被調用,用於向用戶展示一個指導界面。以後都不會再出現。
Step6:registerContentObservers()
registerContentObservers()註冊對指定URI所指定的數據的監聽,及時對數據變化做出反應。
Step7:LauncherModel.startLoader()
在應用啟動的時候需要加載數據,LauncherModel.startLoader()就完成瞭這個任務。加載過程的基本流程如下:
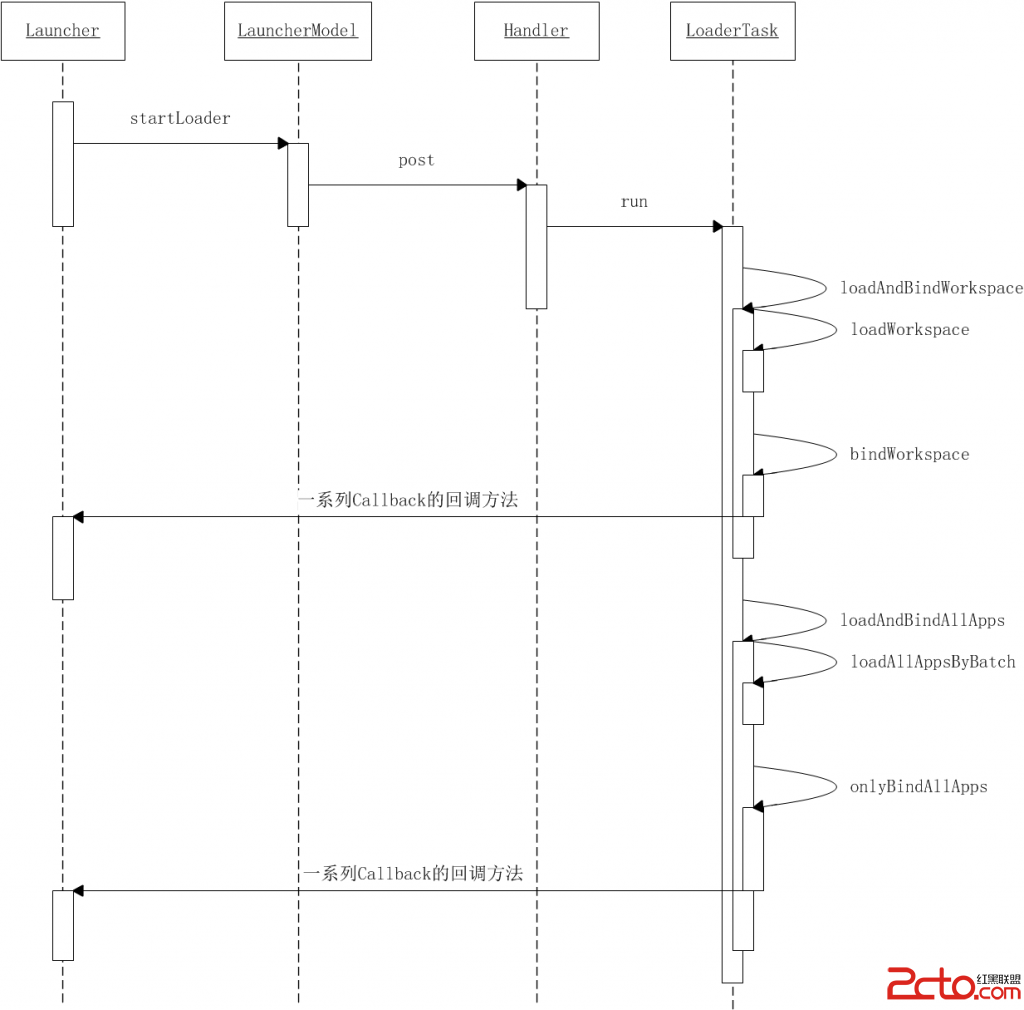
通過上面的時序圖,對加載的流程基本有瞭認識。調用LauncherModel.startLoader()開始加載內容,內容加載完之後,通過LauncherModel.Callbacks接口定義的回
調方法,將數據返回給需要的對象。而Launcher實現瞭這個接口,數據將回傳給Launcher。瞭解瞭基本過程之後,開始進入加載過程。
[java]
public void startLoader(Context context, boolean isLaunching) {
synchronized (mLock) {
……
// Don't bother to start the thread if we know it's not going to do anything
if (mCallbacks != null && mCallbacks.get() != null) {
……
mLoaderTask = new LoaderTask(context, isLaunching);
sWorkerThread.setPriority(Thread.NORM_PRIORITY);
sWorker.post(mLoaderTask);
}
}
}
方法中,創建瞭一個實現瞭Runnable接口的LoaderTask類的對象mLoaderTask,mWork是一個Handler,調用mWork.post()將mLoaderTask添加到消息隊列中。最
後mLoaderTask中的run方法就會得到執行:
[java]
public void run() {
……
keep_running: {
……
if (loadWorkspaceFirst) {
……
loadAndBindWorkspace();
} else {
……
}
if (mStopped) {
break keep_running;
}
……
waitForIdle();
// second step
if (loadWorkspaceFirst) {
……
loadAndBindAllApps();
} else {
……
}
……
}
……
}
如果是初次啟動,則loadWorkspaceFirst=true,loadAndBindWorkspace被調用,此時Workspace中的內容項將被加載並且綁定顯示到Workspace中。當
Workspace中的內容加載之後,調用waitForIdle方法,以等待加載結束。確認完成之後緊接著loadAndBindAllApps()方法執行,在這個方法中將加載AllApps頁面的
內容。這樣加載過程就分成瞭兩個部分:1、loadAndBindWorkspace()加載Workspace內容。2、loadAndBindAllApps()加載AllApps中的內容。這部分內容本文暫
不作深入的分析。
隨著startLoader()的過程執行完畢,Launcher的初始化過程就基本上結束瞭。啟動過程是很繁瑣的,因為所有應用中需要使用到的組件都可能在啟動的時候
進行配置,等到從具體的功能入手的時候,就能夠更加清楚啟動過程所做的操作的意義。
作者:chenshaoyang0011